A Beginner’s Guide to Operating Mixed Meat Filling & Mixing Machines
Entering the world of food production, particularly in sausage making or dumpling filling, often brings beginners face-to-face with a key piece of equipment: the mixed meat filling and mixing machine. Understanding its operation is crucial for achieving consistent, high-quality results efficiently and safely. This guide provides a clear, step-by-step approach for newcomers.
Understanding the Machine
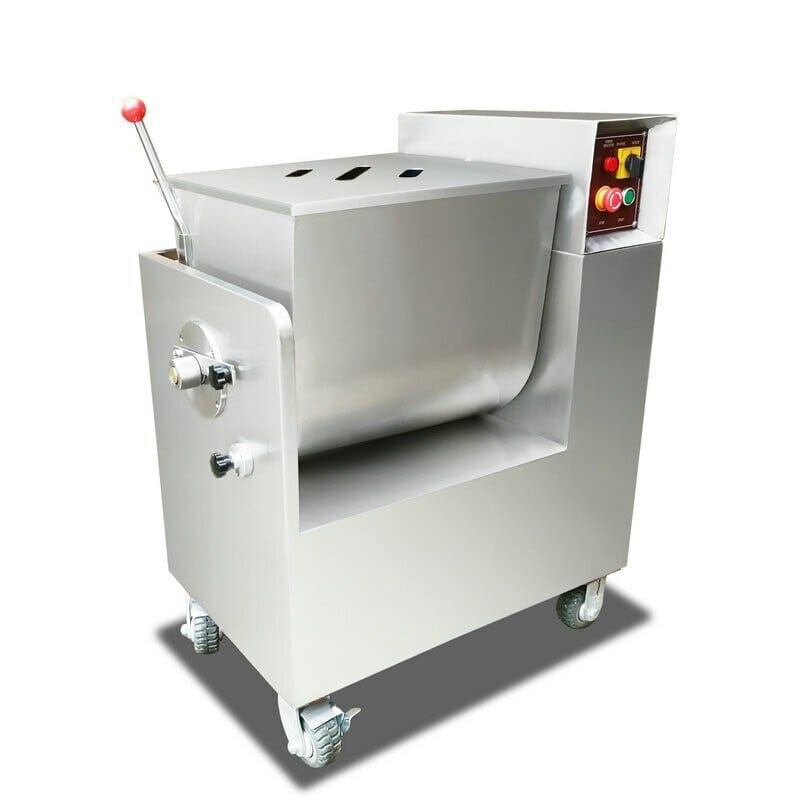
These machines are designed to uniformly mix ground meat with seasonings, fats, and other ingredients, and subsequently pump the mixed filling into casings or other packaging. Key components typically include:
- Mixing Hopper: Where ingredients are loaded.
- Mixing Blades/Paddles: Rotate to blend ingredients thoroughly.
- Auger/Pump System: Transfers the mixed filling from the hopper towards the outlet.
- Filling Nozzle/Tube: Attaches to the outlet for directing the filling into casings or containers.
- Control Panel: Houses switches or dials for power, mixing speed, and pump/filling speed.
Always consult the specific manufacturer’s manual before first use, as designs can vary.
Step-by-Step Operation Guide
Follow these steps carefully to ensure smooth operation:
1. Preparation: Safety & Setup
- Safety First: Wear appropriate PPE (cut-resistant gloves, apron, safety glasses). Ensure hair is tied back and loose clothing/jewelry is secured.
- Cleanliness: Perform thorough sanitization of all machine parts that will contact food. Reassemble correctly.
- Ingredient Readiness: Have all ground meat, seasonings, fats, ice (if required for temperature control), and any additives prepped and ready near the machine.
- Machine Setup: Position the machine on a stable surface. Connect it to the appropriate power source. Ensure the hopper is empty and components like paddles and augers move freely without obstruction.
- Attachment Selection: Choose and securely attach the correct filling nozzle or tube for your intended casing size or container.
2. Loading Ingredients & Initial Mixing
- Start Chilled: Ensure meat is very cold (ideally below 40°F/4°C) before loading. This prevents fat smearing and maintains texture.
- Layering: Place the chilled ground meat into the mixing hopper. Add seasonings, spices, pre-measured ice water (if applicable), and other dry/wet ingredients evenly over the meat.
- Start Mixing: Turn on the power. Set the mixer function to a low speed initially. Mix just long enough to achieve a homogenous blend – usually several minutes. Avoid overmixing at this stage, which can make the meat sticky or tough.
3. Vacuum Function (If Applicable)
Many commercial mixers feature vacuum capabilities:
- Engage Vacuum: Once ingredients are initially combined, close and seal the hopper lid securely if your machine requires it. Turn on the vacuum function. This removes air pockets from the mixture.
- Vacuum Duration: Operate under vacuum for the time recommended in your recipe or manual (typically 1-3 minutes). This improves binding, texture, color, and reduces oxidation.
- Release & Mix: Release the vacuum. You may need to mix briefly again without vacuum to achieve the perfect consistency.
Note: Skip this step if your machine lacks a vacuum function.
4. Filling Process
- Prepare Casings/Containers: Load natural or synthetic casings onto the filling horn/nozzle, ensuring no air is trapped. If filling containers, have them ready.
- Engage Pump/Auger: Switch the machine function from Mixing to Filling/Pumping.
- Set Filling Speed: Use the control panel to select an appropriate filling speed. Start slow as a beginner.
- Begin Filling: Steadily guide the filled casings or direct the filling stream into containers. Maintain consistent pressure and flow.
- Monitor Consistency: Watch for air bubbles or uneven texture, indicating potential issues with the mixture or air in the system.
5. Completion & Cleaning
- Empty the Hopper: Ensure almost all filling has been extruded through the nozzle before stopping the pump.
- Power Down: Turn off the pump/fill function, then turn off the main power switch.
- Prompt Cleaning: This is critical for food safety and machine longevity. Immediately disassemble components contacting food. Use appropriate food-safe cleaning solutions and sanitizers, following manufacturer’s instructions. Thoroughly rinse and dry all parts before reassembly or storage.
Tips for Consistent & Safe Results
- Temperature Control: Keep meat cold throughout grinding, mixing, and filling. Work efficiently in a cool environment.
- Avoid Overmixing: Mix only until ingredients are uniformly distributed. Overmixing emulsifies the fat, leading to a rubbery texture in sausages.
- Use the Correct Attachments: Using a nozzle too large or too small for your casing causes frustration and poor results.
- Practice Speed Control: Mastering consistent filling speed takes practice. Slow and steady usually yields better results than rushing.
- Prioritize Hygiene: Rigorous cleaning prevents cross-contamination and bacterial growth.
Getting Started Smoothly
Modern mixed meat filling and mixing machines are designed with user-friendliness in mind, even for those new to food processing. By adhering strictly to safety protocols, meticulously preparing ingredients, following the step-by-step process outlined above, and performing diligent cleaning, beginners can quickly gain confidence and competence. These machines significantly streamline production, enhance consistency in mixed fillings, and improve overall workflow efficiency for small-scale producers and enthusiasts alike.