Keeping your vacuum cleaner’s roller functioning efficiently requires proper maintenance. Over time, hair, threads, dust bunnies, and debris inevitably accumulate around the brush roller, potentially leading to reduced suction power, strange noises, or even complete jams. For beginners unfamiliar with vacuum mechanics, cleaning this essential component might seem complex, but several straightforward methods exist.

Essential Preparations Before Cleaning
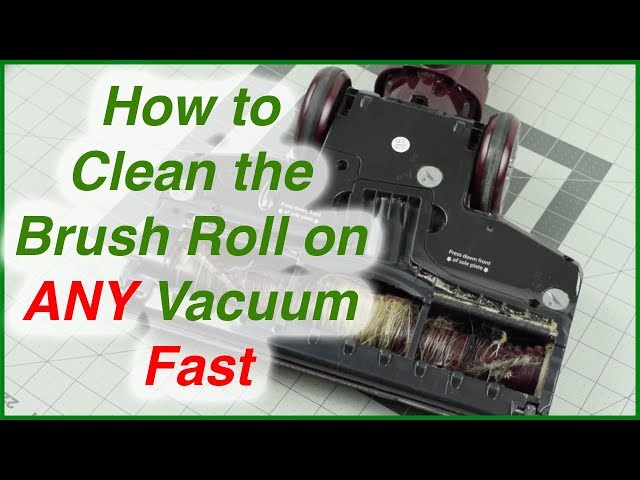
Prior to any cleaning attempt, safety is paramount. Always unplug the vacuum cleaner from the electrical outlet to eliminate any risk of electric shock. Consult your owner’s manual for specific instructions on accessing your model’s roller assembly; common locations include underneath the vacuum head or behind a removable cover.
Gather these basic tools:
- A pair of scissors or a seam ripper
- A utility knife or craft knife (used with extreme caution)
- A lint roller
- Soft-bristled cleaning brushes
- A clean, damp cloth (not soaking wet)
- Dry lint-free cloths
- Tweezers (optional but helpful)
Method 1: The Dry Scrape & Brush Technique (Safest for Beginners)
This method minimizes moisture contact and is generally considered the safest starting point.
- Access the Roller: Position the vacuum cleaner head upside down as per your manual’s guidance. Remove the protective cover or shield to expose the brush roller fully.
- Initial Debris Removal: Use your fingers to manually pull off large, easily accessible clumps of hair, dust, or string wrapped around the roller ends.
- Utilize Scissors/Craft Knife: Carefully slide the blades of scissors or a seam ripper underneath thick loops of hair or thread wrapped tightly around the roller shaft (the central metal bar). Never cut towards yourself or apply excessive pressure towards the roller bristles. For very stubborn fibers caught deep, the tip of a utility knife can gently pry underneath, lifting them enough to cut with scissors. Exercise extreme caution to avoid damaging the roller itself or cutting its bristles. Tweezers can aid in pulling freed debris away.
- Brush Away Fine Dust: Once major debris is removed, use the soft-bristled brush to vigorously sweep all sides of the roller bristles. Pay special attention to the ends where the roller meets the housing and along the entire shaft.
- Lint Roller Final Pass: Use a lint roller over the entire roller surface to pick up any remaining fine dust and lint particles.
- Reassemble: Ensure the roller is completely debris-free and rotates freely. Replace the cover securely.
Method 2: The Careful Damp Wipe Down (When Dry Methods Persist)
For rollers with sticky residue or where fine dust clings persistently, a slightly damp approach might be necessary.
- Complete Dry Removal First: Always perform steps 1-4 of the Dry Scrape & Brush method thoroughly.
- Dampen Cloth Sparingly: Moisten a clean cloth slightly using plain water. Wring it out completely until it’s barely damp to the touch. Excess water is strongly discouraged.
- Wipe Roller Casing: Focus on wiping the inside casing walls surrounding the roller mounting points where sticky residue might accumulate. Avoid soaking the roller bearings.
- Gently Wipe Roller Ends/Shaft: Lightly dab the damp cloth onto the roller ends and the central shaft if grime persists, avoiding the bristles as much as possible. Never immerse the roller in water or run it under the tap.
- Dry Immediately & Completely: Use multiple dry, lint-free cloths to thoroughly wipe down any damp areas on the roller and casing. Ensure absolute dryness before reassembly; moisture can damage bearings and affect motor performance.
- Reassemble: Once completely dry, confirm free rotation and replace the cover.
Important Mistakes to Avoid
- Cutting the Bristles: Never use scissors or a knife directly on the roller’s bristles to cut debris. Always work underneath or around the debris itself.
- Applying Harsh Chemicals: Avoid cleaning solutions, soaps, or solvents. Plain water is sufficient, and even then, used minimally. Chemicals can degrade bristle material and bearings.
- Over-Wetting the Roller: Submerging the roller or using overly wet cloths risks water seeping into bearings and the motor housing, causing rust, corrosion, or electrical shorts.
- Forcing a Jammed Roller: If the roller won’t turn after cleaning and reassembly, do not force the vacuum to run. Double-check debris removal and roller seating.
- Neglecting Drying Time: Reassembling while any moisture remains invites damage.
Frequency and Signs Your Roller Needs Cleaning
Regular cleaning extends the roller’s life and maintains vacuum performance. Clean the roller:
- At least monthly under normal home conditions.
- More frequently (weekly or bi-weekly) if you have pets with long hair.
- Immediately if you notice visible debris buildup, reduced pickup efficiency, strange noises (a “whirring” or “straining” sound), burning smells, or the roller has stopped spinning altogether.
Following these simple, step-by-step methods allows beginners to effectively clean a vacuum roller without causing damage. Consistent maintenance prevents larger issues and ensures your vacuum cleaner operates effectively for a longer lifespan. Remember to handle tools with care, prioritize safety by unplugging, and always allow components to dry completely before using the appliance.