10 years of experience as a food machinery equipment manufacturer

Best Way to Clean Vacuum Brush Roller: DIY Method vs Professional Help!

Best Way to Clean Vacuum Brush Roller: DIY Method vs Professional Help!

Maintaining optimal cleaning performance often hinges on the condition of a vacuum cleaner’s brush roller. Over time, hair, string, and various debris inevitably wrap around the roller, hindering its rotation, reducing suction power, and potentially damaging the motor or belts. When it comes to freeing this crucial component from its tangles, homeowners typically face two main paths: tackling the task themselves or seeking professional assistance. Both approaches have distinct merits and drawbacks.

Best Way to Clean Vacuum Brush Roller: DIY Method vs Professional Help!

The Persistent Problem of Clogged Brush Rolls

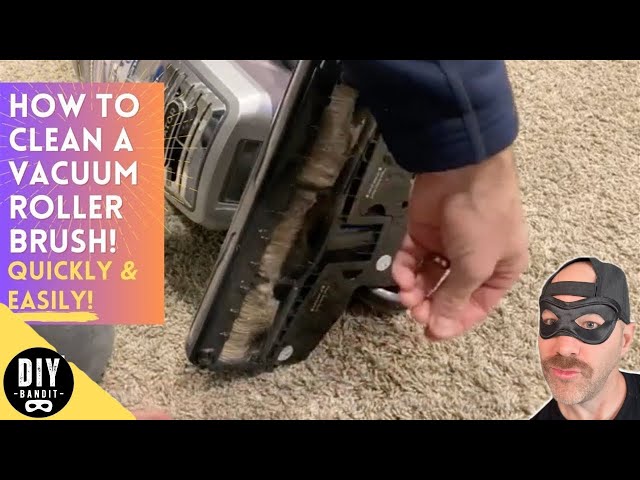
A heavily entangled brush roller isn’t just a nuisance; it directly impacts cleaning effectiveness. Reduced rotation prevents the brush from effectively agitating carpets to dislodge dirt, while the drag caused by wrapped debris forces the vacuum’s motor to work harder, potentially shortening its lifespan. Ignoring regular cleaning can lead to the roller seizing entirely or causing drive belts to snap. Recognizing the signs of a clogged roller – unusual noises, visible debris, decreased pickup performance – is the first step towards resolution.

DIY Cleaning: Taking Matters Into Your Own Hands

For many, cleaning the brush roller is a routine maintenance task performed at home. The appeal lies in immediate accessibility and cost savings.

Essential Tools and Steps

A typical DIY cleaning session requires minimal tools:

  • Sharp scissors or a seam ripper: Crucial for carefully cutting through tightly wound hair and threads.
  • Cleaning brush or old toothbrush: Used to dislodge finer dust, pet hair, and lint embedded between bristles.
  • Tweezers (optional): Helpful for stubborn, short strands deeply wrapped at the ends.
  • Mild soap and water (optional): Sometimes used for wiping down the roller housing or soaking the end caps if removable and extremely dirty.

The basic process involves:

  1. Removing the roller: Turning off and unplugging the vacuum is mandatory. Access usually involves detaching the soleplate or brush cover, then carefully lifting out the brush roll, often by releasing end caps or clips.
  2. Cutting and Cleaning: Carefully cut strands wrapped around the ends first, avoiding the bristles. Then, cut strands along the length of the shaft, pulling them away. Use the brush to thoroughly clean between the bristles across the entire roller.
  3. Inspecting: Check the roller bearings (ends) for smooth rotation and ensure the belt is intact and seated correctly.
  4. Reassembly: Carefully slot the roller back into its housing, ensuring the belt is positioned correctly, and securely reattach the soleplate or cover.

Pros and Cons of the DIY Route

  • Pros: Minimal cost (often just tools already owned), immediate action, fosters familiarity with appliance maintenance.
  • Cons: Can be time-consuming for severe tangles; risk of accidental damage (cutting bristles, nicking the roller shaft, breaking clips); requires basic technical aptitude; dealing with grime can be messy; difficult to deep-clean bearings without disassembly.

Professional Cleaning: Leaving It to the Experts

For those short on time, lacking confidence in disassembly, or facing a particularly stubborn roller clog, professional cleaning services offer a viable alternative.

What Professional Cleaning Typically Entails

Beyond simply removing wrapped debris, professional services often provide a more thorough service:

  • Deep Cleaning: Using specialized tools for efficient and safe cleaning.
  • Bearing Inspection and Lubrication: Checking roller ends for wear and ensuring smooth rotation.
  • Full System Check: Often includes inspecting belts, filters, and the overall vacuum path for blockages or issues.
  • Sanitization: Some services offer sanitization options for the brush roll and housing.

Costs can vary depending on the service provider, the vacuum model, and the level of service chosen, generally ranging from a moderate fee to a higher rate depending on the shop and location.

Pros and Cons of Professional Help

  • Pros: Expertise minimizes risk of damage; saves personal time and effort; often includes valuable supplementary checks (belt, filters); potentially extends appliance life.
  • Cons: Requires arranging service and potentially being without the vacuum for a short period; adds cost beyond DIY; requires finding a reputable local service.

DIY vs. Professional: Choosing the Right Path

The optimal choice depends heavily on individual circumstances.

Scenario Recommended Approach
Regular maintenance cleaning (light tangles) DIY
Lack of time / Desire for convenience Professional
Extensive tangles / Major clog Professional (often more efficient)
Uncertainty about disassembly / Fear of damage Professional
Tight budget / Enjoy DIY tasks DIY

Maximizing Brush Roller Longevity

Regardless of the cleaning method chosen, prevention is key. Regularly cutting long hair or thick cords before vacuuming, avoiding large debris, and emptying the dustbin frequently (which improves suction and reduces the chance of debris wrapping around the roller) can significantly extend the time between cleanings. The choice between DIY and professional cleaning is ultimately a personal one, balancing cost, time, convenience, and confidence. Understanding both options empowers homeowners to make the best decision for their specific needs and ensure their vacuum performs optimally for years to come.

Share This :

Leave a Reply

Your email address will not be published. Required fields are marked *

Funiture-white.png
Far far away, behind the word mountains, far from the countries Vokalia and Consonantia there live the blind texts.